
A pergola looks effortless when it’s done well. Posts plumb, beams level, rafters evenly spaced overhead. What you rarely see coming, until a season or two in, is the slow failure that starts at the connections. A lean here, some movement at the base there, a post that’s started to shift. These aren’t design failures but construction ones, and most of them were preventable.
The first decision that determines longevity is the wood species and treatment. Pressure-treated lumber rated for ground contact is the minimum for posts that will be set in concrete or soil. For the beams and rafters above, cedar and redwood hold up well in most climates without treatment, though they’ll still benefit from a penetrating sealer applied before assembly, not after. Choosing a nominal 6×6 post over a 4×4 for any pergola wider than ten feet is not overbuilding; it’s appropriate sizing for the load.
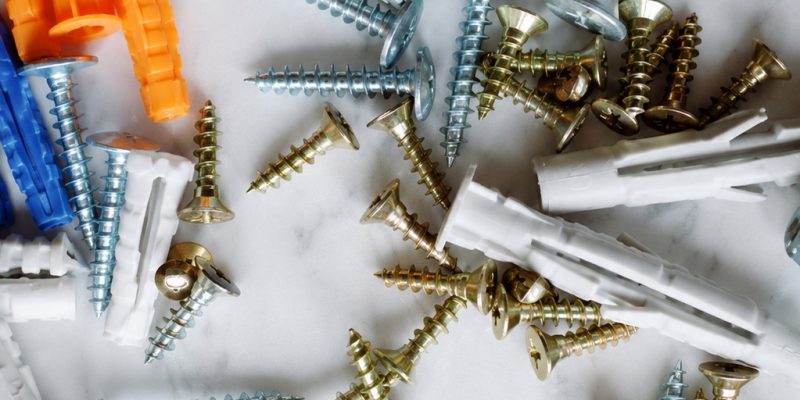
The connections are where most DIY pergola builds fall short. Toenailing posts to beams, or using screws that are too short to develop real holding strength, leaves the structure vulnerable to racking under wind load and seasonal movement. Structural lag screws, heavy-gauge, hex-head fasteners designed for timber-to-timber connections, are the right tool for post-to-beam and beam-to-rafter joints that need to stay tight over years of outdoor exposure, not just the first summer.
Getting the Foundation Right
Posts set directly into soil, even with concrete backfill, are a long-term maintenance problem. The base of the post stays damp, which accelerates rot regardless of treatment rating. A better approach is to pour an above-grade concrete footing with a post base bracket set while the concrete is still wet. The bracket holds the post off the surface, keeps it dry, and still allows a secure connection at the base.
Frost Line and Footing Depth
In any climate with seasonal ground freezing, footings must extend below the local frost line. A footing that sits above the frost depth will heave as the ground expands in winter, gradually tilting posts and opening up joints. Your local building department can tell you the required depth for your area in minutes, and it’s worth the call.
Structural Connections on Attached Pergolas
When a pergola attaches to a house, the ledger board connection becomes a structural concern in the same category as a deck ledger. The American Wood Council notes in its guidance on outdoor wood connections that nailed-only ledger connections have been a documented cause of structural failures, and that bolts or lag screws are required by code for proper load transfer. An attached pergola that’s fastened only with nails is genuinely unsafe under load.
Star Fasteners Plus carries structural lag screws suited to these connections, with thread geometry that maintains holding power in pressure-treated lumber without causing the corrosion issues that cheaper fasteners develop over time.
Rafter Overhang and Notching
Rafters that simply rest on top of beams without positive connection will walk outward over time. A bird’s mouth notch cut into each rafter, combined with a structural screw driven at an angle through the rafter into the beam, keeps everything in place. It takes a few extra minutes per rafter and makes a real difference by year three.
A pergola built with the right materials and proper connections needs almost no intervention for a decade or more. The ones that don’t last were usually fine on the outside and wrong on the inside, from the first day.


Comments